

How the Lab works
This page explains how messages get into your Lab flow, what they look like, and how they get out again. Read it once before building your first flow – most surprises in the Lab come from one of the points below.
🔌 – Connecting a Lab
Section titled “🔌 – Connecting a Lab”A Lab only receives traffic from chargers whose Charger Profile uses it. In the Charger Profile, select the Lab and one or more CPMS. Every CPMS of every profile that uses the Lab becomes an input of the Lab’s output component.
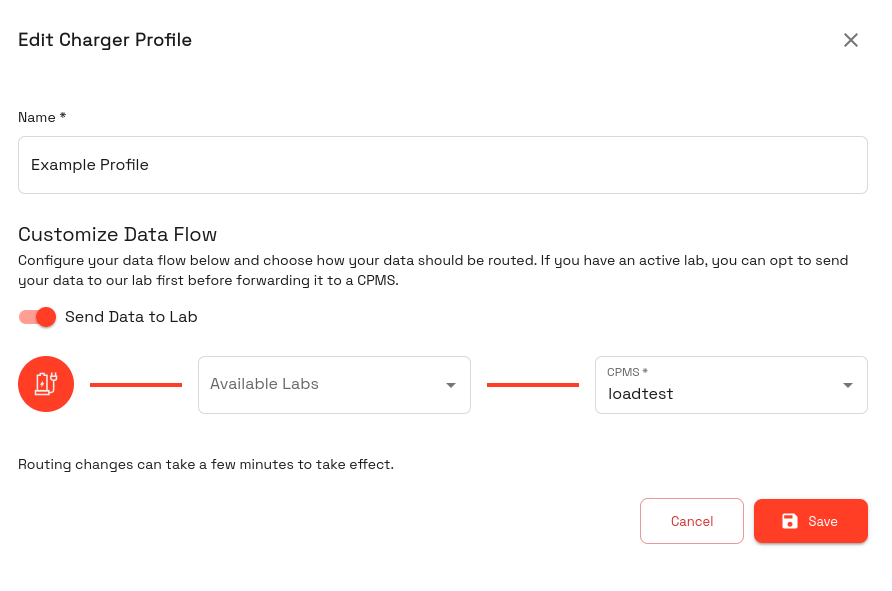
When you add or remove a CPMS from a profile, the Lab updates its inputs automatically. Existing wires to a CPMS stay connected; wires to a removed CPMS are deleted.
🔀 – Message flow
Section titled “🔀 – Message flow”Every Lab contains two components that cannot be deleted:
| Component | Ports | Purpose |
|---|---|---|
| Exolink Connect - Input | Output 0: From CPMS Output 1: From Charger |
Everything that arrives from a CPMS or a charger. |
| Exolink Connect - Output | Input 0: To Charger Input 1…n: To CPMS <id> |
Everything you connect here is sent to the charger or to that CPMS. |
The ID of each CPMS is shown in the input’s tooltip. You can find the ID in the CPMS list (the ID column is hidden by default).
A new Lab starts with the simplest possible flow – a transparent proxy to the first CPMS:
Exolink Connect - Input Exolink Connect - Output From CPMS ───────────────────────▶ To Charger From Charger ───────────────────────▶ To CPMS <id>Everything else you build goes between those two components.
📨 – The message object
Section titled “📨 – The message object”Every message that leaves Exolink Connect - Input is a JavaScript object. This is what you work with in Debug, Switch, Code and every other component.
{ "chargerId": "DE*EXO*E0001", "msgFrom": "charger", "msgType": "CALL", "msgId": "a1b2c3d4-0001", "action": "StatusNotification", "ocpp": [2, "a1b2c3d4-0001", "StatusNotification", { "connectorId": 1, "errorCode": "NoError", "status": "Available" }], "msgAt": "2026-10-03T08:15:00.000Z", "chargerProtocol": ["ocpp1.6"], "profileId": 123, "tenant": "your-tenant", "backendId": 45, "address": "198.51.100.23", "rayId": "…"}| Field | Description |
|---|---|
chargerId |
ID of the charger (the last part of its connection URL). |
msgFrom |
charger or cpms – who sent the message. |
msgType |
CALL (request), CALLRESULT (answer), CALLERROR (error answer) or event (connection event, see below). |
msgId |
OCPP message ID. A request and its answer share the same msgId. |
action |
OCPP action, e.g. BootNotification. Answers carry the action of their request – the answer to a BootNotification has action: "BootNotification" and msgType: "CALLRESULT". For events this is the event name. |
ocpp |
The raw OCPP-J frame. [2, msgId, action, payload] for a CALL, [3, msgId, payload] for a CALLRESULT, [4, msgId, errorCode, errorDescription, details] for a CALLERROR. The payload is therefore ocpp[3] for requests and ocpp[2] for answers. |
msgAt |
When the message was received. |
chargerProtocol |
WebSocket subprotocols of the charger, e.g. ["ocpp1.6"]. |
profileId |
Charger Profile the charger is connected with. |
backendId |
ID of the CPMS a message came from (on From CPMS). |
address |
IP address of the charger. |
rayId |
Trace ID. Mention it when you contact support about a specific message. |
To send a message, connect an object of the same shape to Exolink Connect - Output. chargerId and ocpp are required; the easiest way is to change the object you received and send it on. The port you connect to decides where it goes – msgFrom is set automatically.
⚡ – Connection events
Section titled “⚡ – Connection events”Besides OCPP messages, the Lab receives events about the charger’s WebSocket connection. They have msgType: "event" and no ocpp field.
action |
Arrives on | When |
|---|---|---|
SESSION_CREATED |
From Charger | A charger is connecting. Includes chargerProtocol, authMethod and credentials. |
SESSION_CREATED_RESPONSE |
From CPMS | The CPMS accepted or rejected the connection. If it failed, status contains the HTTP status (e.g. 401, or 504 if the CPMS did not answer in time) and headers the CPMS’s response headers. |
SESSION_CLOSED |
From Charger | The charger disconnected. code and reason contain the WebSocket close code and reason. |
Connection events must pass through your flow just like OCPP messages. A charger is only accepted once a CPMS accepts it: SESSION_CREATED has to reach at least one To CPMS input, and the SESSION_CREATED_RESPONSE has to reach To Charger. If the response does not arrive within a few seconds, the charger’s connection is rejected. With several CPMS, the charger is accepted as soon as one of them accepts.
In the OCPP Action Switch, SESSION_CREATED is listed as connect and SESSION_CLOSED as disconnect.
🧷 – Keep instance
Section titled “🧷 – Keep instance”Every component has a Keep instance checkbox in its settings, which is on by default. Leave it on.
Besides the visible data, each message carries information the Lab needs to deliver it – for example the way back to the right charger, or the open HTTP request that an HTTP Response answers. If you turn Keep instance off on a component, only the message object is passed on and that information is lost. Typical symptoms: chargers that no longer connect, or HTTP Response failing with “No controller to use for response!”.
🔤 – Variables
Section titled “🔤 – Variables”Use variables for values you don’t want to repeat in several components – URLs, tokens, lists of test chargers. Open Global Variables in the Lab menu and add one variable per line:
# Comments start with # or //WEBHOOK_URL : https://example.com/hooks/ocppWEBHOOK_TOKEN : s3cr3t-t0kenHEARTBEAT_INTERVAL (number) : 300FORWARD_METERVALUES (boolean) : trueTEST_CHARGERS (json) : ["DE*EXO*E0001", "DE*EXO*E0002"]Reference a variable as @[NAME] in component settings (URLs, headers, topics, conditions, code, …). The text is replaced before the component uses it.
- Leave a space after the colon and don’t use quotes.
NAME : valueworks,NAME:valueloses the first character andNAME : "value"keeps the quotes as part of the value. - Names may contain only letters, digits and underscores.
@[MY_URL]works,@[my-url]is not replaced. - If a variable doesn’t exist or its value is empty,
0orfalse, the text@[NAME]stays as it is. There is no error, so a typo usually shows up as a comparison that never matches. Print the value with a Debug component ordebug()in a Code component to check. - Supported types:
string(default),number,boolean,json,date,random(a random string of the given length). @[NAME]always inserts text. To use ajsonvariable as a list or object, read it in a Code component withcontext.global.variable('NAME').
🐞 – Debugging
Section titled “🐞 – Debugging”- Debug component – shows the data it receives in the Console tab on the right side of the designer.
debug(value)in a Code component does the same from inside your code.- Component status – most components show their last value or an error below their name.
Debug output is only shown while the Lab designer is open in your browser and is not stored. Open the designer before you reproduce a problem.
Debug components are cheap but not free: on a Lab with many chargers, a Debug component on From Charger prints every message. Use a Switch or the Debug component’s Path setting to narrow it down, and remove debug output you no longer need.
💾 – Saving and deploying
Section titled “💾 – Saving and deploying”Changes are live as soon as you save the flow. Running charger connections stay open while you save. A message that is being processed at the exact moment you save may be lost, so prefer quiet hours for larger changes on a production Lab.